Servicing “Non-Rebuildable” Staked In U-Joint
How to Service Non-Rebuildable Staked-In U-Joints with PTC
PTC offers a cost-saving solution for replacing non-rebuildable staked-in U-joints. This guide provides step-by-step instructions for safely removing and installing replacement joints—without replacing the entire driveshaft assembly.
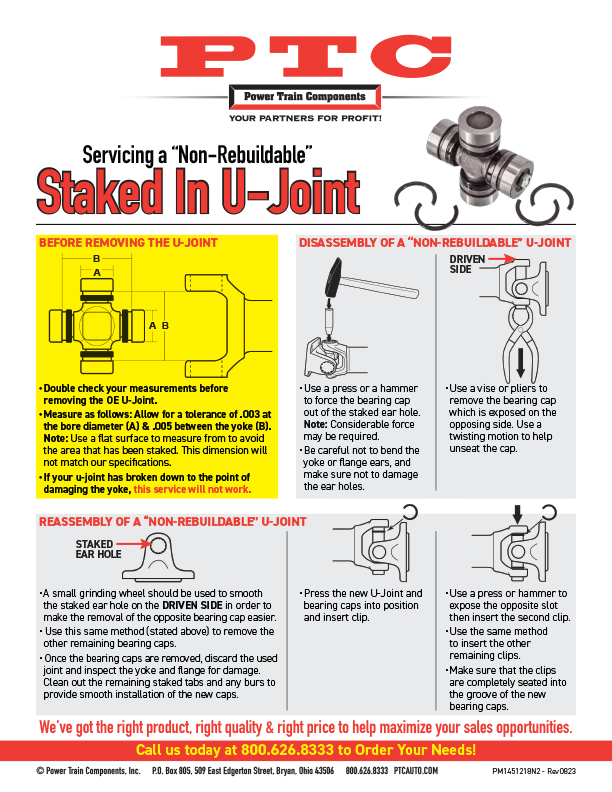
Before Removing the OE U-Joint
- Double-check measurements to confirm fit. Allow for a tolerance of .003″ at the bore (A) and .005″ between the yoke (B).
- Use a flat surface for accurate measurements—avoid the staked area which will not match specifications.
- Inspect the yoke—if damaged, this service may not be viable.
Disassembly Instructions
- Use a press or hammer to force the bearing cap out of the staked ear hole. Considerable force may be required.
- Use a small grinding wheel to smooth the driven side staked hole, making the second cap easier to remove.
- Use pliers or a vise to remove the remaining exposed bearing cap with a twisting motion.
- Once all caps are removed, inspect the yoke and flange and clean out burrs and staked tabs before reassembly.
Reassembly Instructions
- Press or hammer the new U-joint and bearing caps into position and insert the first clip.
- Expose the opposite slot and insert the second clip using the same method for remaining clips.
- Ensure all clips are fully seated into the bearing cap grooves to prevent failure.
PTC makes it possible to service so-called ‘non-rebuildable’ joints—saving you time and money with every job.